If your cold outreach emails are ending up in spam, you’re likely missing three key email authentication protocols: SPF, DKIM, and DMARC. These protocols verify your identity as a sender, protect your domain from being spoofed, and boost your chances of landing in the inbox. Without them, email providers like Gmail and Outlook are more likely to flag your messages as suspicious.
Here’s how to set up these protocols, avoid common Gmail warm-up mistakes, and test your configuration and test email placement to ensure your cold outreach emails reach their destination.
SPF (Sender Policy Framework) is an email authentication protocol that works through DNS settings to determine which mail servers and IP addresses are allowed to send emails on behalf of your domain. When you send a cold email, the recipient's server checks your domain's SPF record - a TXT entry in your DNS settings - and confirms if the sending server's IP address matches the authorized list.
This process is critical because cold emails are often flagged for scrutiny. In fact, nearly 60% of email deliverability issues stem from incorrect SPF setups. Setting up SPF correctly can lead to a delivery success rate of up to 99% and reduce bounce rates by 30%.
When your email arrives at the recipient's server, SPF verifies the "Return-Path" address (RFC5321.MailFrom) - the address used for handling bounces, not the visible "From" address. The server checks if the sending IP is listed in your SPF record. If it matches, the email passes authentication. If it doesn’t, the server follows your specified policy, which could include rejecting the email, marking it as spam, or accepting it with caution.
SPF records follow a specific format. They start with the v=spf1 tag, use mechanisms like ip4 and ip6 to define allowed IP addresses, and include third-party services with the include directive. The record ends with a qualifier: -all (hard fail) rejects unauthorized emails outright, while ~all (soft fail) flags them as suspicious.
Matthew Vernhout, Principal Email Advisor at Email Industries, emphasizes the importance of getting SPF right:
"DNS is the backbone of your email strategy. A well-configured SPF record keeps spammers out and your reputation intact. But a single typo? It's like handing the keys to your domain to the bad guys."
Next, we’ll dive into how DKIM adds another layer of security to your cold outreach.
SPF helps ensure your emails reach their destination by proving you’re a legitimate sender. Proper SPF setup can boost delivery rates by 20%, and authenticated senders are 2.7 times more likely to land in the primary inbox. It also protects your sender reputation by blocking unauthorized servers from impersonating your domain.
That said, SPF isn’t perfect. It only validates the "Return-Path" address, leaving the visible "From" address vulnerable to forgery by phishers. SPF can also fail when emails are forwarded, as the forwarding server’s IP might not be in your SPF record. Additionally, SPF has a strict limit of 10 DNS lookups. Exceeding this limit triggers a "PermError", invalidating your record - an issue that causes nearly 20% of SPF records to fail.
To get started, use a soft fail (~all) during the initial setup to monitor email traffic without risking legitimate emails being blocked. Once all sending sources are verified, switch to a hard fail (-all) to block unauthorized senders. If you’re managing multiple outreach tools and approaching the 10-lookup limit, consider using dedicated subdomains (e.g., sales.yourdomain.com), as each subdomain has its own lookup limit.
For even better results, consider using tools like Warmforge (https://warmforge.ai) to automate email warm-up and monitor deliverability. These tools can help ensure your SPF, along with DKIM and DMARC, stays properly configured to optimize your cold outreach campaigns.
DKIM (DomainKeys Identified Mail) is an email authentication protocol that attaches a cryptographic digital signature to your outgoing emails. Think of it as a virtual seal of authenticity, ensuring that your email originates from your domain and hasn’t been tampered with during transit. For cold outreach, this is a game-changer. Email providers like Gmail and Outlook are naturally cautious about unsigned emails, often treating them as suspicious. DKIM acts as your digital proof, showing that you’re a legitimate sender and not someone trying to spoof your domain.
Al Iverson, Industry Research and Community Engagement Lead at Valimail, emphasizes its importance:
"DKIM is the first and most important thing you need to set up before beginning email sends from any email marketing automation platform. With DKIM properly configured, you put your authentic self forward: proving that only you can send emails using your domain."
Starting February 1, 2024, both Google and Yahoo will require DKIM authentication for senders handling more than 5,000 emails daily.
DKIM relies on a pair of cryptographic keys to validate your emails. Your mail server uses a private key to sign each outgoing email, creating a unique hash based on its content and headers. Meanwhile, the public key is stored in your domain’s DNS records, where receiving servers can access it to verify the signature. When an email is received, the recipient’s server locates your public key via a DNS path formatted as [selector]._domainkey.[yourdomain].com. It then decrypts the signature and compares it to the email’s current content. If even a minor change has occurred, the hash won’t match, and the DKIM check will fail.
The DKIM signature includes several tags that guide the receiving server on what to verify:
| DKIM Tag | Purpose |
|---|---|
| v= | Indicates the DKIM version (usually v=1) |
| d= | Specifies the domain responsible for the message |
| s= | Identifies the selector used to find the public key in DNS |
| h= | Lists the headers included in the signature (e.g., From, Subject) |
| bh= | Ensures the email’s body content hasn’t been altered |
| b= | Contains the cryptographic signature of the headers and body |
Unlike SPF, which can fail when emails are forwarded, DKIM remains valid because its signature is embedded in the email header.
Security is another key feature of DKIM. While 512-bit keys can be cracked within 24 hours for about $70, 2048-bit keys are exponentially more secure, requiring an estimated 300 trillion years to breach with current technology.
This robust system not only validates your emails but also lays the groundwork for improving cold outreach success.
Setting up DKIM can significantly improve your email deliverability. Authenticated senders typically see inbox placement rates between 85% and 95% and are 2.7 times more likely to land in the primary inbox compared to unauthenticated senders. Beyond better deliverability, DKIM helps safeguard your domain’s reputation by preventing unauthorized parties from spoofing your domain, ultimately reducing spam complaints over time.
However, DKIM isn’t without its challenges. Configuration can be tricky, especially if you’re juggling multiple email services. You’ll need to generate keys, correctly publish DNS records, and ensure everything aligns with your DMARC policy. A 2024 study revealed that while 96.6% of published DKIM records were valid, a small percentage still contained errors. Additionally, while major providers like Gmail and Outlook always check DKIM, smaller or outdated servers might skip this verification.
To get the most out of DKIM, consider these best practices:
If you’re using tools like Warmforge (https://warmforge.ai) for email warm-up, they can monitor your DKIM setup and alert you to any issues before they affect your deliverability. This proactive approach ensures your cold outreach campaigns maintain the trust signals inbox providers look for.
While DKIM strengthens your sender reputation, it works hand in hand with other protocols like SPF. Together, they set the stage for DMARC, which enforces domain-level policies to further protect your emails. With DKIM ensuring message integrity, you’re one step closer to a fully secured email strategy.
DMARC (Domain-based Message Authentication, Reporting, and Conformance) is the final piece of the puzzle that ties SPF and DKIM together. While SPF and DKIM verify different parts of your email, DMARC ensures that the domain in your visible "From" address matches the domain authenticated by either SPF or DKIM. This alignment is what separates legitimate emails from spoofed ones. For cold outreach, this is a game-changer because it builds trust with recipients and email providers.
DMARC plays a key role in establishing credibility with major providers like Gmail and Outlook. Starting February 1, 2024, both Google and Yahoo will require bulk senders handling over 5,000 emails daily to implement at least a basic DMARC policy. This isn’t just about following the rules - domains with strong DMARC enforcement often see a 5% to 10% boost in deliverability rates. Beyond better delivery, DMARC protects your sender reputation by preventing bad actors from spoofing your domain for phishing attacks, which are responsible for 85% of cyberattacks.
"DMARC is not just a record, it's a process of organizing your email program to keep spoofers from impersonating you." - Mailgun
DMARC also provides detailed reports that show every server and IP address sending emails on your behalf. These reports are incredibly useful for spotting unauthorized senders, identifying forgotten tools, and catching malicious activity before it damages your reputation. For example, in 2025, a SaaS company that analyzed its DMARC reports moved from a monitoring policy to strict enforcement. Within 90 days, spam complaints dropped by 41%. This kind of insight is crucial for maintaining the clean sender reputation that cold outreach relies on.
DMARC uses a DNS record to tell receiving servers what to do if your emails fail SPF or DKIM checks. It offers three enforcement levels: p=none (monitoring only), p=quarantine (send to spam), and p=reject (block entirely). When an email arrives, the server checks if the "From" domain matches the authenticated domain. If it doesn’t and your policy is strict, the server follows your instructions.
DMARC also has a reporting system that collects data on your email traffic. You can specify email addresses in your DNS record using rua (aggregate reports) and ruf (forensic reports) tags. Aggregate reports give a big-picture view of authentication success rates, while forensic reports provide detailed information on specific failures. Since these reports are in XML format, you’ll likely need third-party tools to analyze them.
For gradual implementation, DMARC includes a pct tag that allows you to enforce policies on a percentage of emails. For instance, setting pct=10 means only 10% of emails that fail authentication will be quarantined or rejected.
Marcel Becker, Senior Director of Product at Yahoo, highlights the ultimate goal:
"The end goal is ideally a policy of p=reject. That's what DMARC is for. Ensuring that your domain cannot be spoofed and protecting our mutual customers from abuse."
These features make DMARC an essential tool for improving email deliverability and protecting your domain.
DMARC offers significant benefits for cold outreach. Fully authenticated senders using SPF, DKIM, and enforced DMARC achieve 85% to 95% inbox placement and are 2.7 times more likely to reach the inbox compared to unauthenticated senders. DMARC enforcement alone can boost email delivery rates by up to 10%. Additionally, organizations that enforce DMARC see phishing attempts drop by 80% to 90%.
However, implementing DMARC isn’t always straightforward. Up to 80% of domains with a DMARC record struggle to reach enforcement due to issues with SPF or DKIM configuration. The reporting system, while valuable, produces complex XML data that often requires third-party tools for interpretation. Rushing to strict enforcement without identifying all legitimate email sources can also result in blocking valid emails.
To make the most of DMARC, follow these best practices:
p=none policy initially to gather data without risking email rejection. Gradually move to p=quarantine and then to p=reject over 60 to 120 days.If you’re using Warmforge (https://warmforge.ai) for email warm-up and deliverability monitoring, the platform can track your DMARC setup and alert you to authentication issues before they affect your campaigns. This proactive approach helps maintain trust with inbox providers and protects your domain from spoofing attempts.
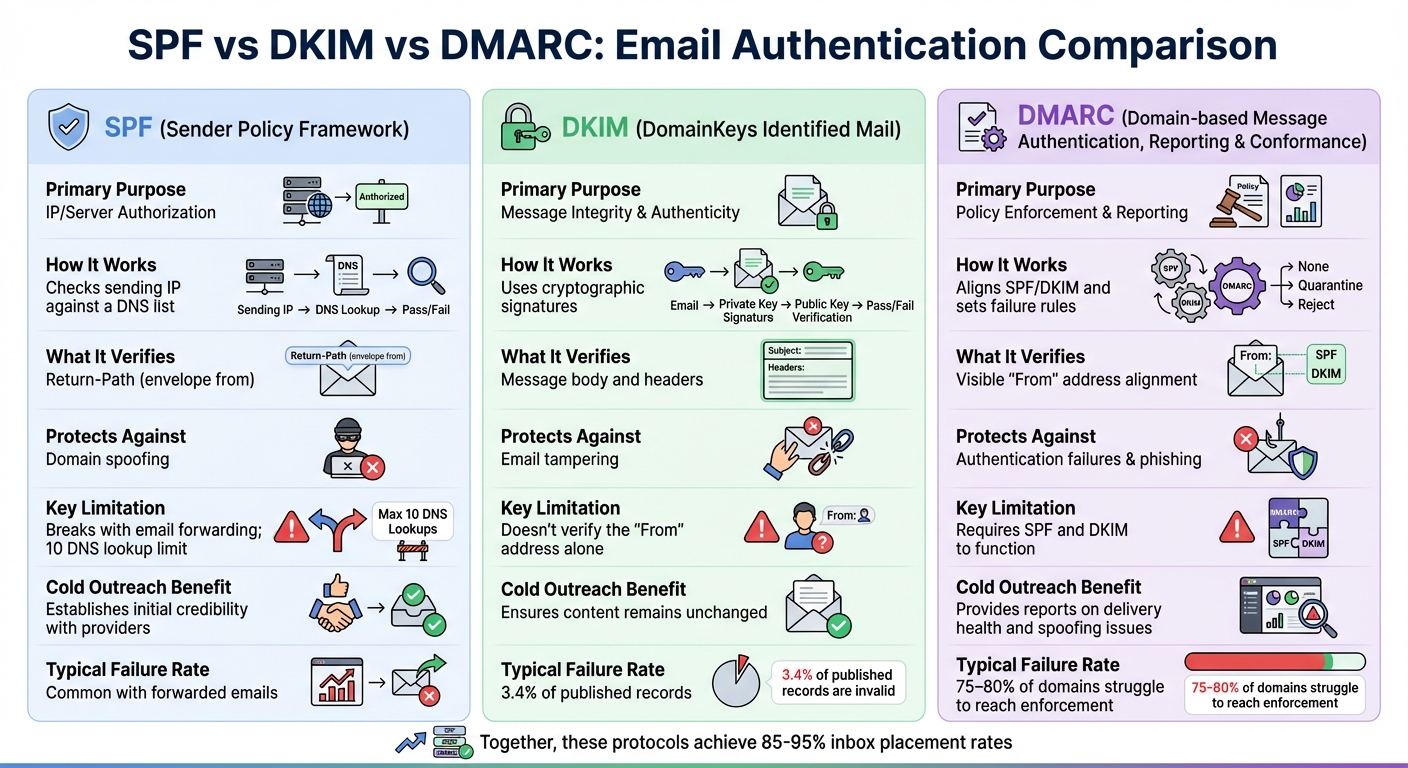
SPF vs DKIM vs DMARC Email Authentication Protocols Comparison
SPF, DKIM, and DMARC work together to create a strong email authentication system, especially crucial for cold outreach. The table below outlines the key differences between these protocols to help you understand their roles and how they complement each other.
| Feature | SPF | DKIM | DMARC |
|---|---|---|---|
| Primary Purpose | IP/Server Authorization | Message Integrity & Authenticity | Policy Enforcement & Reporting |
| How It Works | Checks sending IP against a DNS list | Uses cryptographic signatures | Aligns SPF/DKIM and sets failure rules |
| What It Verifies | Return-Path (envelope from) | Message body and headers | Visible "From" address alignment |
| Protects Against | Domain spoofing | Email tampering | Authentication failures & phishing |
| Key Limitation | Breaks with email forwarding; 10 DNS lookup limit | Doesn't verify the "From" address alone | Requires SPF and DKIM to function |
| Cold Outreach Benefit | Establishes initial credibility with providers | Ensures content remains unchanged | Provides reports on delivery health and spoofing issues |
| Typical Failure Rate | Common with forwarded emails | 3.4% of published records are invalid | 75–80% of domains struggle to reach enforcement |
Each protocol has its strengths and weaknesses, but together they form a comprehensive solution. For example, SPF can falter when emails are forwarded, DKIM ensures the content remains intact, and DMARC provides actionable insights to improve email delivery and security.
Using all three protocols effectively can significantly boost your email deliverability. In fact, authenticated senders leveraging SPF, DKIM, and DMARC with proper enforcement can achieve inbox placement rates of 85% to 95%. Recognizing this, providers like Google and Yahoo will require all three protocols for bulk senders (sending over 5,000 emails daily) starting February 1, 2024.
Think of these protocols as the legs of a three-legged stool - remove one, and the entire structure collapses. This comparison highlights why following an email authentication checklist to configure all three is essential for maintaining email security and deliverability.
To ensure everything works as it should, set up SPF, DKIM, and DMARC in that order. Each setup involves adding DNS records to your domain, and keep in mind that DNS changes can take up to 48 hours to fully propagate.
Make sure your domain has only one SPF record and one DMARC record to avoid authentication issues. If you’re using multiple email services, combine all authorized services into a single SPF record instead of creating separate ones.
Start by identifying all the services that send emails on behalf of your domain. This includes your email provider (like Google Workspace or Microsoft 365), CRM tools, email warm-up platforms (e.g., Warmforge), and marketing automation software. Forgetting even one service could lead to failed email authentication.
Log in to your DNS provider (e.g., GoDaddy, Cloudflare, Namecheap) and add a new TXT record. Set the Host field to @ (representing your root domain). The record value must follow a specific syntax listing all authorized sending services. For example, if you use Google Workspace, your SPF record would look like this:
v=spf1 include:_spf.google.com ~all
Here’s a quick reference for common providers:
| Provider | SPF Record Value |
|---|---|
| Google Workspace | v=spf1 include:_spf.google.com ~all |
| Microsoft 365 | v=spf1 include:spf.protection.outlook.com -all |
| Multiple Services | v=spf1 include:_spf.google.com include:sendgrid.net ~all |
Start with ~all (soft fail) to test your setup. This marks unauthorized emails as suspicious without blocking them outright. Once you’ve verified all senders, switch to -all for stricter protection, which rejects unauthorized emails entirely.
Be mindful of the 10-lookup limit. Each include: statement counts as one DNS lookup. If you’re nearing the limit, consider using subdomains like sales.yourdomain.com for specific purposes.
Once SPF is set, move on to configuring DKIM for added email security.
DKIM secures your emails with cryptographic signatures to ensure they haven’t been altered. You’ll generate keys through your email service and publish the public key as a DNS record.
For Google Workspace users:
Go to Apps > Google Workspace > Gmail > Authenticate Email. Click "Generate New Record" and select 2048-bit encryption. Google will provide a TXT record with a selector name (usually google). Add this record to your DNS with the Host field set to google._domainkey. Once done, return to Google Workspace and click "Start Authentication."
For Microsoft 365 users:
Access the Microsoft 365 Defender portal and navigate to Email & Collaboration > Policies & Rules > Threat Policies > Email Authentication Settings. Enable DKIM signing for your domain. Microsoft will provide two CNAME records (e.g., selector1 and selector2) for key rotation. Add these records to your DNS as instructed, then enable DKIM signing in the portal.
"DKIM is the first and most important thing you need to set up before beginning email sends from any email marketing automation platform." - Al Iverson, Industry Research and Community Engagement Lead, Valimail
Always use 2048-bit keys for stronger security. If your DNS provider doesn’t support them, you may need to use CNAME records instead of TXT records.
With SPF and DKIM in place, you’re ready to implement DMARC.
DMARC builds on your SPF and DKIM setups, defining how receiving servers should handle emails that fail authentication. It also provides valuable reporting to help you track how your domain is being used - or misused.
Add a new TXT record to your DNS with the Host field set to _dmarc. Start with a monitoring-only policy that doesn’t affect email delivery:
v=DMARC1; p=none; rua=mailto:[email protected]
Replace [email protected] with your reporting email address.
Here’s a breakdown of DMARC policies:
| Policy | Action | When to Use |
|---|---|---|
p=none |
No action; monitoring only | Initial setup and data review |
p=quarantine |
Send failures to spam folder | Intermediate stage |
p=reject |
Block failing emails entirely | Final stage for maximum security |
"Start with a none policy that only monitors email flow, and then eventually change to a policy that rejects all unauthenticated messages." - Google Workspace
Run the p=none policy for 30–60 days while reviewing the aggregate reports. These reports show which services are passing or failing authentication, helping you monitor inbox placement across different providers. Once you’ve confirmed all legitimate senders are authenticated, gradually tighten your policy to p=quarantine and finally to p=reject.
For cold outreach, strict DMARC policies are crucial to ensure your emails land in inboxes. Authenticated senders with DMARC enforcement on warmed domains typically achieve inbox placement rates of 85%–95%. Without DMARC, deliverability suffers - implementing it can boost email delivery rates by as much as 10%.
If you’re managing multiple domains or handling high email volumes, platforms like Infraforge can streamline the process. As Karlo Binda, Founder of Leadsnack.co, explains:
"Procedures that usually took hours (setting DKIM, SPF, etc. records) for multiple domains, now take a few minutes"
Once you've added your DNS records, it's essential to confirm they're functioning as intended. Keep in mind that DNS updates can take up to 48 hours to fully propagate. Testing ensures your emails pass authentication checks before you kick off your cold outreach campaigns. Let’s dive into the tools you can use to verify your DNS records.
MXToolbox: This tool performs DNS lookups to validate record syntax, detect duplicate SPF entries, and check if your domain or IP is listed on blacklists.
DMARCLY: By sending a test email to [email protected], you'll receive a detailed report showing whether SPF, DKIM, and DMARC checks passed or failed.
Google Postmaster Tools: A must-have for monitoring your reputation with Gmail users, this tool tracks spam complaint rates, delivery errors, and your domain's overall reputation.
Warmforge: This platform offers continuous deliverability monitoring, including reputation scoring and periodic inbox placement tests to ensure your emails land in the primary inbox rather than spam. Users get one free placement test per month, along with DNS health checks and blacklist scanning.
GlockApps: Perfect for seed list testing, GlockApps reveals where your emails end up - Inbox, Spam, or Promotions - across providers like Gmail, Outlook, and Yahoo. Pricing starts at $59 per month for 100 placement tests.
Here’s a quick comparison of these tools:
| Tool | Primary Function | Best For |
|---|---|---|
| MXToolbox | DNS & Blacklist Lookup | Syntax validation and blocklist checks |
| GlockApps | Inbox Placement Testing | Determining email placement (Inbox or Spam) |
| MailTester | Pre-send Spam Scoring | Quick email health assessments |
| Warmforge | Reputation Monitoring | Continuous deliverability protection |
| DMARCLY | Report Analysis | Simplifying DMARC reports |
When you use these tools, aim for clear "PASS" statuses to confirm everything is set up correctly. For SPF, DKIM, and DMARC, ensure the sending IP is authorized, the DKIM signature matches, and the "From" domain aligns. Misalignment is a common reason emails get flagged as spam.
Reliable authentication is critical to ensure your cold outreach emails avoid spam filters. Regular audits help sustain email deliverability, as DNS settings can change unexpectedly. Whether you're switching email providers, migrating hosts, or adding new sending services, these changes can disrupt previously configured authentication records. Alarmingly, between 75% and 80% of domains with DMARC records encounter issues with proper enforcement due to configuration errors.
To stay ahead, review DMARC reports weekly to spot unauthorized IP addresses. Since these reports are often in XML format and tricky to interpret manually, tools like DMARCLY or Warmforge can break down the data into actionable insights.
"DMARC, DKIM, and SPF are important for protecting your domain. Implemented correctly, they'll boost your deliverability rate and customer experience. Left forgotten, your messages might end up in email purgatory: the spam folder."
– Valimail
Keep an eye on your SPF record to ensure it doesn’t exceed the 10-DNS lookup limit. Exceeding this limit triggers a PermError, invalidating authentication. If you're nearing the limit, consider using subdomains (e.g., sales.yourdomain.com) for specific campaigns.
For cold outreach, authentication is even more critical since recipients are unfamiliar with your domain. Regular placement tests can reveal how various providers handle your emails. Domains with strong DMARC enforcement can see a 5% to 10% boost in deliverability.
Lastly, rotate your DKIM keys every 6–12 months to maintain strong cryptographic security. Routine testing ensures authentication remains intact and keeps your emails landing where they should - your recipient's inbox.
Even when authentication is set up correctly, mistakes can still creep in. Research indicates that 67% of SPF records contain errors that lead to delivery issues, with 30% involving syntax mistakes and 20% exceeding the 10-lookup limit. Knowing these common errors - and how to address them - can make all the difference in keeping your emails out of the spam folder.
SPF, DKIM, and DMARC are powerful tools, but they’re not foolproof. Here are some of the most frequent errors that can cause problems:
include, a, or mx mechanism in an SPF record counts as a DNS lookup. Exceeding the 10-lookup cap triggers a "PermError", which causes authentication to fail - even if the IP is authorized.
If emails are ending up in spam or failing authentication, the first step is to analyze the email header. Send a test email to a Gmail account, then click "Show original" to check for "SPF: PASS", "DKIM: PASS", and "DMARC: PASS". Any failures will point you in the right direction.
Here’s how to address specific issues:
include statements, replace hostnames with IP addresses, or delegate high-volume sending to subdomains (e.g., sales.yourdomain.com).
d= tag matches your "From" domain.
p=none policy to monitor traffic using RUA reports. Gradually move to p=quarantine and eventually to p=reject over several weeks.
Real-world examples show the impact of fixing these errors. In 2025, UniteSync, a staffing company, achieved an 85.26% positive reply rate and a $2.86 Customer Acquisition Cost (CAC) by aligning their technical infrastructure. Similarly, a SaaS company reduced spam complaints by 41% in 90 days after resolving alignment issues and enforcing a stricter DMARC policy.
For ongoing monitoring, tools like MXToolbox can validate syntax, while Google Postmaster Tools help track your domain reputation. Keeping spam complaints below the 0.3% threshold required by major providers is crucial. Regular audits ensure small mistakes don’t spiral into bigger problems, safeguarding your email campaigns and keeping your outreach effective.
SPF, DKIM, and DMARC work together like a digital passport, confirming your identity and safeguarding your domain’s reputation. SPF designates which servers can send emails on your behalf, DKIM ensures your message remains unaltered during delivery, and DMARC ties everything together by aligning these protocols and instructing receiving servers on how to handle authentication failures. When implemented correctly, these measures significantly boost your chances of landing in the inbox.
But setting up these protocols isn’t enough. Ongoing attention is critical. Regular testing and monitoring ensure your cold outreach campaigns stay on track. Even minor changes - like switching email providers or tweaking tools - can disrupt authentication. That’s why weekly health checks and reviewing DMARC reports are essential. It’s worth noting that 75% to 80% of domains with DMARC records don’t reach full enforcement, which underscores the importance of consistent oversight.
Tools like Warmforge make this process easier by automating reputation building, monitoring domain health, and running inbox placement tests to see where your emails actually land. With features like health scores ranging from 0 to 100 (where anything below 97 signals potential issues), Warmforge provides actionable insights. Plus, it offers one free warm-up slot and one placement test per month, so you can test its value without committing upfront.
Authentication isn’t a one-and-done task - it’s an ongoing effort. Regular testing, a monitoring-first DMARC policy, consolidated SPF records, and automation tools like Warmforge are your best allies in maintaining strong deliverability. Keep your spam complaint rate under 0.3%, and with consistent testing and smart automation, your cold outreach will remain effective and trustworthy.
When it comes to making sure your emails land in the recipient's inbox - and not their spam folder - SPF, DKIM, and DMARC are your go-to protocols. These tools work together to verify the authenticity of your messages and protect your domain from misuse.
By setting up these protocols, you not only protect your domain’s reputation but also increase the chances of your emails getting delivered where they belong - right in the primary inbox.
To take it a step further, tools like Warmforge can help fine-tune your email outreach. They monitor deliverability, run placement tests, and ensure your emails behave in a way that inbox providers trust, making your campaigns even more effective.
Mistakes in setting up SPF, DKIM, and DMARC can seriously hurt your email deliverability and sender reputation. With SPF, common issues include exceeding the 10-lookup limit or authorizing too many IPs, which weakens its effectiveness or causes it to fail altogether. Jumping straight to a hard-fail (-all) policy without ensuring all legitimate senders are included can also block valid emails.
For DKIM, missteps like relying on outdated 1024-bit keys, making typos in DNS records, or forgetting to enable signing on your mail server can leave your setup useless. When it comes to DMARC, moving to a p=reject policy too quickly - without first addressing alignment issues or reviewing reports - can lead to lost emails and missed chances to refine your configuration.
This is where Warmforge steps in. It simplifies the entire process by automatically spotting misconfigurations, validating key settings, and offering real-time feedback. With its AI-powered tools, you can ensure your emails land in primary inboxes while safeguarding your sender reputation from day one.
Regularly keeping an eye on your SPF, DKIM, and DMARC records is essential because these protocols aren’t something you can just set up and forget. Even minor adjustments - like adding a new email-sending service, changing an IP address, or accidental tweaks to DNS settings - can throw these records out of alignment. When that happens, your legitimate cold emails might fail authentication and end up flagged as spam. On top of that, DMARC reports give you valuable insights into who’s sending emails on your behalf and whether those emails are passing authentication. This helps you catch spoofing attempts or configuration issues before they damage your sender reputation.
Warmforge takes the hassle out of this process with automated, AI-driven monitoring for SPF, DKIM, and DMARC. It provides real-time alerts if anything changes or fails, helping you keep your email campaigns on track and out of spam folders. By actively managing these records, you safeguard your domain, prevent spoofing, and boost the success of your cold outreach efforts.