Setting up an SMTP relay for Office 365 on Windows Server allows devices and applications that can't authenticate with Office 365 to send emails securely. This guide explains how to configure a Windows Server to relay emails through Exchange Online using an IP-authenticated connector. Here’s what you need to know:
This approach centralizes email sending, supports high email volumes, and ensures compatibility with Office 365. Follow the detailed steps to configure and test your setup effectively.
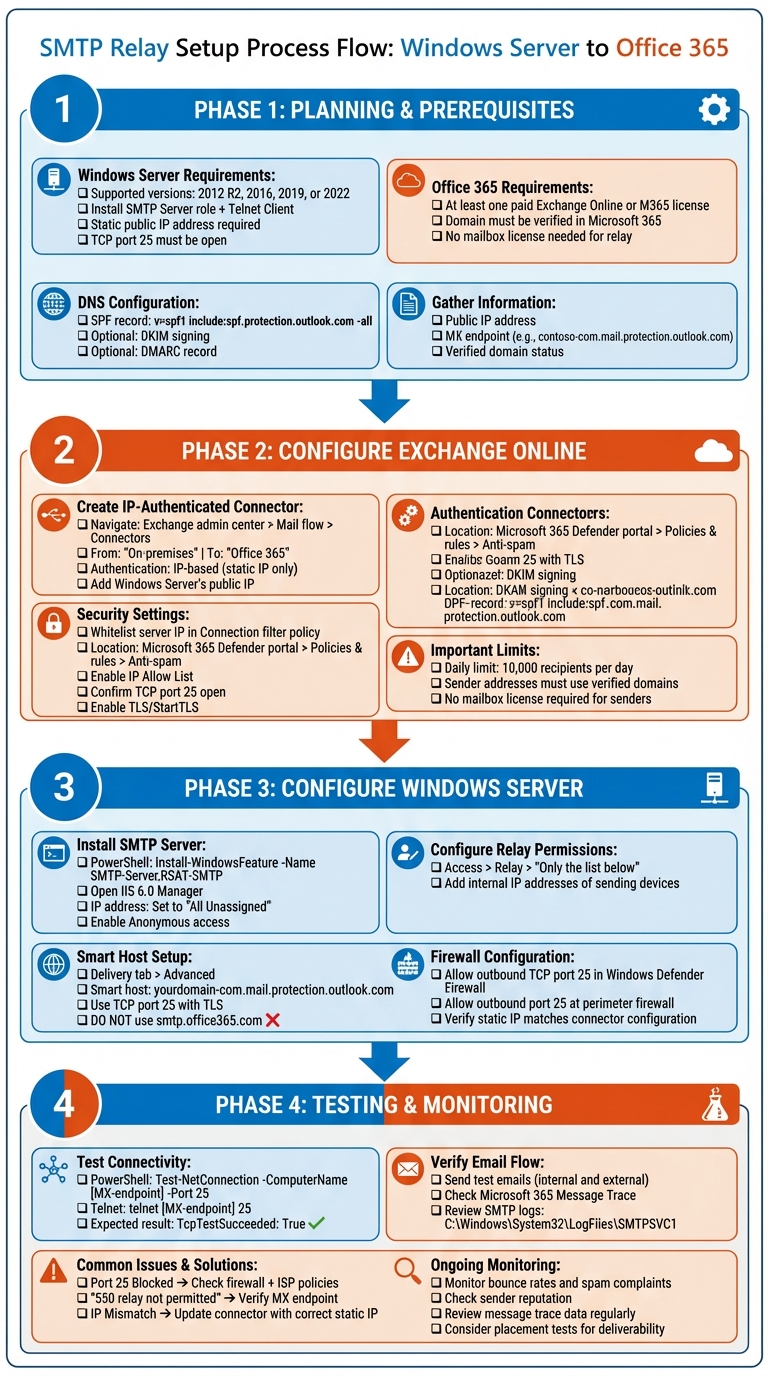
SMTP Relay Setup for Office 365 on Windows Server: Complete Configuration Workflow

To set up the relay, you'll need a supported version of Windows Server - 2012 R2, 2016, 2019, or 2022. The SMTP Server role is essential for this configuration. You can install it using PowerShell with the following command:
Install-WindowsFeature -Name SMTP-Server,Telnet-Client -IncludeAllSubFeature -IncludeManagementTools -Restart
This command also installs Telnet, which will help later when testing connectivity to port 25.
For Office 365, you’ll need at least one paid Exchange Online or Microsoft 365 license. If the sending domain is verified, you don’t need a mailbox license for the relay. Additionally, set up an inbound connector in Office 365 and scope it to your server’s public IP for authentication purposes.
Make sure your server has a static public IP and that TCP port 25 is open to the Office 365 MX endpoint. To check connectivity, use this command:
telnet yourdomain-com.mail.protection.outlook.com 25
Lastly, double-check your DNS settings and ensure compliance records are properly configured.
To authorize Exchange Online as a sender for your domain, add an SPF TXT record like this:
v=spf1 include:spf.protection.outlook.com -all
Since your relay uses Exchange Online as the smart host, outgoing messages will originate from Microsoft’s IP ranges. If you use other outbound mail systems alongside Office 365, update your SPF record to include their mechanisms (e.g., ip4 entries or additional include statements) to prevent delivery issues.
You can also enable DKIM signing for your domain in Exchange Online and publish a DMARC record if required. For example:
v=DMARC1; p=quarantine; rua=mailto:...
To verify your SPF record, use online tools or run the following command from a command prompt:
nslookup -type=TXT yourdomain.com
Before moving forward, collect the following essential details:
curl ifconfig.me in PowerShell to find your public IP. Confirm it matches your network documentation.contoso-com.mail.protection.outlook.com).Document your public IP, MX endpoint, sending domains, sending hosts, estimated daily email volume, and security contacts. Use Exchange Online reports to monitor bounce rates, spam filtering, and mailbox placement. For better deliverability and reputation tracking, consider tools like Warmforge to automate mailbox warm-up and ongoing checks.

To get started, head over to the Microsoft 365 admin center, then navigate to Exchange admin center > Mail flow > Connectors. Click the + icon to create a new connector. For the configuration, choose "On-premises" as the "From" server and "Office 365" as the "To" server.
Give your connector a name like "Windows Server SMTP Relay". Select the option for IP authentication and input your Windows Server's static public IP address. Keep in mind that dynamic IPs are not supported. Double-check the IP address for accuracy, and then save the connector.
To ensure smooth operation, whitelist your Windows Server's static IP in the Connection filter policy. Go to the Microsoft 365 Defender portal, then navigate to Policies & rules > Threat policies > Anti-spam. Open the Connection filter policy, enable the IP Allow List, and add your server's IP address. This step helps trusted relay sources bypass spam filters.
Also, confirm that TCP port 25 is open and that TLS/StartTLS is enabled. These settings are essential for secure communication between your Windows Server and Exchange Online.
Once these steps are complete, you can configure your Windows Server to act as the SMTP relay host.
When choosing sender addresses, make sure they belong to verified Office 365 domains. Any unverified domains will be rejected. The good news? These sender addresses don’t need to be tied to a mailbox or require a license. Just ensure your tenant’s subscription allows the use of connectors.
Lastly, be aware of Microsoft’s daily limit for SMTP relay, which caps at 10,000 recipients per day. If you need to send emails beyond this limit, you’ll need to explore alternative sending methods.
To get started, you'll need to install the SMTP Server feature on your Windows Server. This can be done easily with PowerShell, which also includes the necessary management tools:
Install-WindowsFeature -Name SMTP-Server,RSAT-SMTP -IncludeAllSubFeature -IncludeManagementTools
Once the installation is complete, open IIS 6.0 Manager and locate the SMTP Virtual Server. Right-click on it and select Properties. On the General tab, ensure the IP address is set to All Unassigned. Then, navigate to Access → Authentication and confirm that Anonymous access is enabled. This is important because authentication will be handled at the Office 365 connector level using your static IP address.
Next, configure the relay permissions. Under Access → Relay, choose "Only the list below" and add the internal IP addresses of devices that need to send emails through the relay. For example, this could include printers or monitoring tools. This step ensures that only specified devices can use your relay, adding an extra layer of control.
Finally, set up your smart host settings to direct outbound mail properly.
To configure your smart host, go to the SMTP Virtual Server Properties, click on the Delivery tab, and then select Advanced. In the Smart host field, enter your MX endpoint, which usually looks like yourdomain-com.mail.protection.outlook.com. Avoid using smtp.office365.com, as this endpoint is meant for client submission and requires username/password authentication. Since your relay relies on IP-based trust, using the wrong endpoint will result in authentication errors.
Make sure to use TCP port 25 with TLS encryption for outbound connections. Office 365 SMTP relay requires this specific setup. However, keep in mind that many ISPs in the U.S. block port 25 by default to prevent spam. If you're using a residential or basic business internet connection, you may need to request that your ISP unblock this port or consider upgrading to a business-class connection.
After setting up the smart host, verify your firewall and network configurations to ensure seamless connectivity.
Before proceeding, double-check that your server's static IP matches the one configured in the Exchange Online connector. Your relay server's public IP address must remain static to align with the IP-based trust model used by Microsoft 365.
On the Windows Server, ensure that Windows Defender Firewall allows outbound TCP port 25. You can create a custom rule or confirm that the SMTPSVC service is already permitted. At the perimeter firewall, allow outbound TCP port 25 from your relay server's public IP to Microsoft 365's MX endpoints. If port 25 is blocked at the network edge, emails may queue up or fail to send.
To test the connection, run the following command from your relay server:
telnet yourdomain-com.mail.protection.outlook.com 25
If the connection fails, it’s likely that port 25 is blocked somewhere along the network path.
After completing the setup, keep an eye on email deliverability by monitoring bounce rates and NDR codes using Microsoft 365 Message Trace. For organizations sending a high volume of emails, tools like Warmforge can be a helpful addition. Warmforge automates email warm-up, performs placement tests, and tracks whether emails land in the inbox or spam folder. It even offers one free warm-up slot (for a Google or Microsoft mailbox) and a free placement test per month, which can be especially useful for ensuring smooth email delivery in the U.S. market, where spam filtering is often stringent.
Once you've completed the setup, it's time to ensure everything is working by testing the email flow. A straightforward way to do this is by using PowerShell alongside the Telnet client. If the Telnet client isn’t installed yet, you can add it with this command:
Install-WindowsFeature -Name Telnet-Client
After installation, open a command prompt and connect to your MX endpoint on port 25:
telnet yourdomain-com.mail.protection.outlook.com 25
If the connection is successful, you'll see a response from the Microsoft server. You can then use SMTP commands to manually send a test email. Alternatively, you can check connectivity more quickly using PowerShell's Test-NetConnection command:
Test-NetConnection -ComputerName yourdomain-com.mail.protection.outlook.com -Port 25
A successful connection will show TcpTestSucceeded: True. If it fails, it’s likely that port 25 is blocked. Both methods confirm whether your system can connect to Exchange Online.
After testing, review the delivery status of your test emails using the Microsoft 365 Message Trace tool under the Mail flow section. For more detailed diagnostics, check the SMTP logs located at:
C:\Windows\System32\LogFiles\SMTPSVC1
If you're still encountering issues, it’s a good idea to double-check your Exchange Online connector settings.
When troubleshooting SMTP relay issues, some common problems include blocked ports, incorrect smart host configurations, or mismatched IP addresses.
SMTPSVC and IISADMIN services on your Windows Server.
| Common Error | Symptoms | Resolution Steps |
|---|---|---|
| Port 25 Blocked | Connection timeouts | Check firewall rules and ISP policies; test with Test-NetConnection; contact ISP |
| Smart Host Misconfigured | 550 relay not permitted errors | Verify you’re using the correct MX endpoint (avoid smtp.office365.com) |
| IP Mismatch | Emails rejected by connector | Add your static public IP to the Exchange connector settings |
Once you've addressed connectivity issues, the next step is to focus on email deliverability. Ensuring emails land in the inbox - not the spam folder - is essential for maintaining a strong sender reputation. Regularly review your SMTP logs and confirm that connector settings are accurate, especially if you’re managing multiple servers.
For businesses sending frequent email campaigns or notifications, tools like Warmforge can be invaluable. Warmforge provides features like deliverability monitoring and placement tests. They offer one free placement test per month and a free warm-up slot for Microsoft mailboxes. The warm-up feature simulates natural email behavior, helping to build trust with email service providers and improve your sender reputation.
Setting up SMTP relay for Office 365 on a Windows Server involves careful preparation, secure connector configuration, and a properly secured server. Make sure you’ve covered the basics: a static public IP, port 25 open, and verified sender domains. Skipping these steps is one of the most common reasons for relay failures or rejected messages.
Once your connector is active and the Windows Server SMTP service is configured with the correct smart host, testing becomes critical. Send test messages both internally and externally, then use Exchange Online message traces and SMTP logs to confirm end-to-end delivery. Keep in mind, passing these tests doesn’t guarantee your emails will avoid spam folders - factors like sender reputation and email content still play a role.
Regular monitoring is just as important as the initial setup. Check bounce rates, spam complaints, and message trace data in the Microsoft 365 admin center to identify and address issues early. For organizations that send frequent notifications or campaigns, tools like Warmforge can support deliverability efforts. Warmforge offers automated mailbox warm-ups, placement tests, and health checks for DNS records and blacklist status. With one free warm-up slot and one placement test per month, it’s a practical way to validate your relay traffic and safeguard your sender reputation without additional costs.
SMTP relay is particularly useful for devices or applications that don’t support modern authentication or need to send from multiple addresses. However, it’s not a one-and-done setup. Keep your firewall rules strict, limit relay access to trusted internal sources, and document connector IPs and DNS settings for easier updates in the future. By combining a solid configuration with ongoing monitoring, you can keep your Office 365 SMTP relay secure, dependable, and performing as intended.
Using an SMTP relay with Office 365 comes with several advantages that can enhance your email operations. For starters, it improves email deliverability by authenticating messages properly, which lowers the risk of your emails ending up in spam folders. This ensures your communications reach the intended recipients without unnecessary roadblocks.
Another key benefit is the added layer of security it provides. By verifying outgoing emails and safeguarding sensitive data during transmission, an SMTP relay helps maintain a secure email flow, giving you peace of mind when handling important information.
It also simplifies email management, especially for businesses that handle a high volume of emails. By centralizing the process, you can ensure consistent performance across all outgoing messages. When configured and monitored correctly, an SMTP relay not only streamlines communication but also helps you stay aligned with security and compliance standards.
To fix SMTP relay issues on Windows Server, start by reviewing your DNS and MX records to ensure they’re set up correctly. Then, double-check the connector settings in Office 365 to confirm everything aligns with the required authentication protocols like SPF, DKIM, and DMARC. Running email flow diagnostics can also help uncover any errors that might be causing the problem.
It's just as important to look over your firewall rules to verify that the right ports are open. Also, check if your server's IP address has been added to any blacklists, as this could block email delivery. For a more hands-on solution, tools like Warmforge can help you stay on top of deliverability issues and run health checks, making it easier to identify and resolve email delivery challenges quickly.
To keep your SMTP relay secure, start by enabling TLS authentication. This ensures your connections are encrypted, keeping sensitive information safe. Next, set up SPF, DKIM, and DMARC records. These tools help prevent email spoofing and boost your email deliverability. Limit relay access to specific trusted IP addresses or authenticated users to reduce the risk of unauthorized use. Lastly, keep an eye on your email traffic. Regular monitoring can help you spot unusual activity quickly, allowing you to address potential threats and maintain a secure system.